How To Do Planks and Make Them Harder
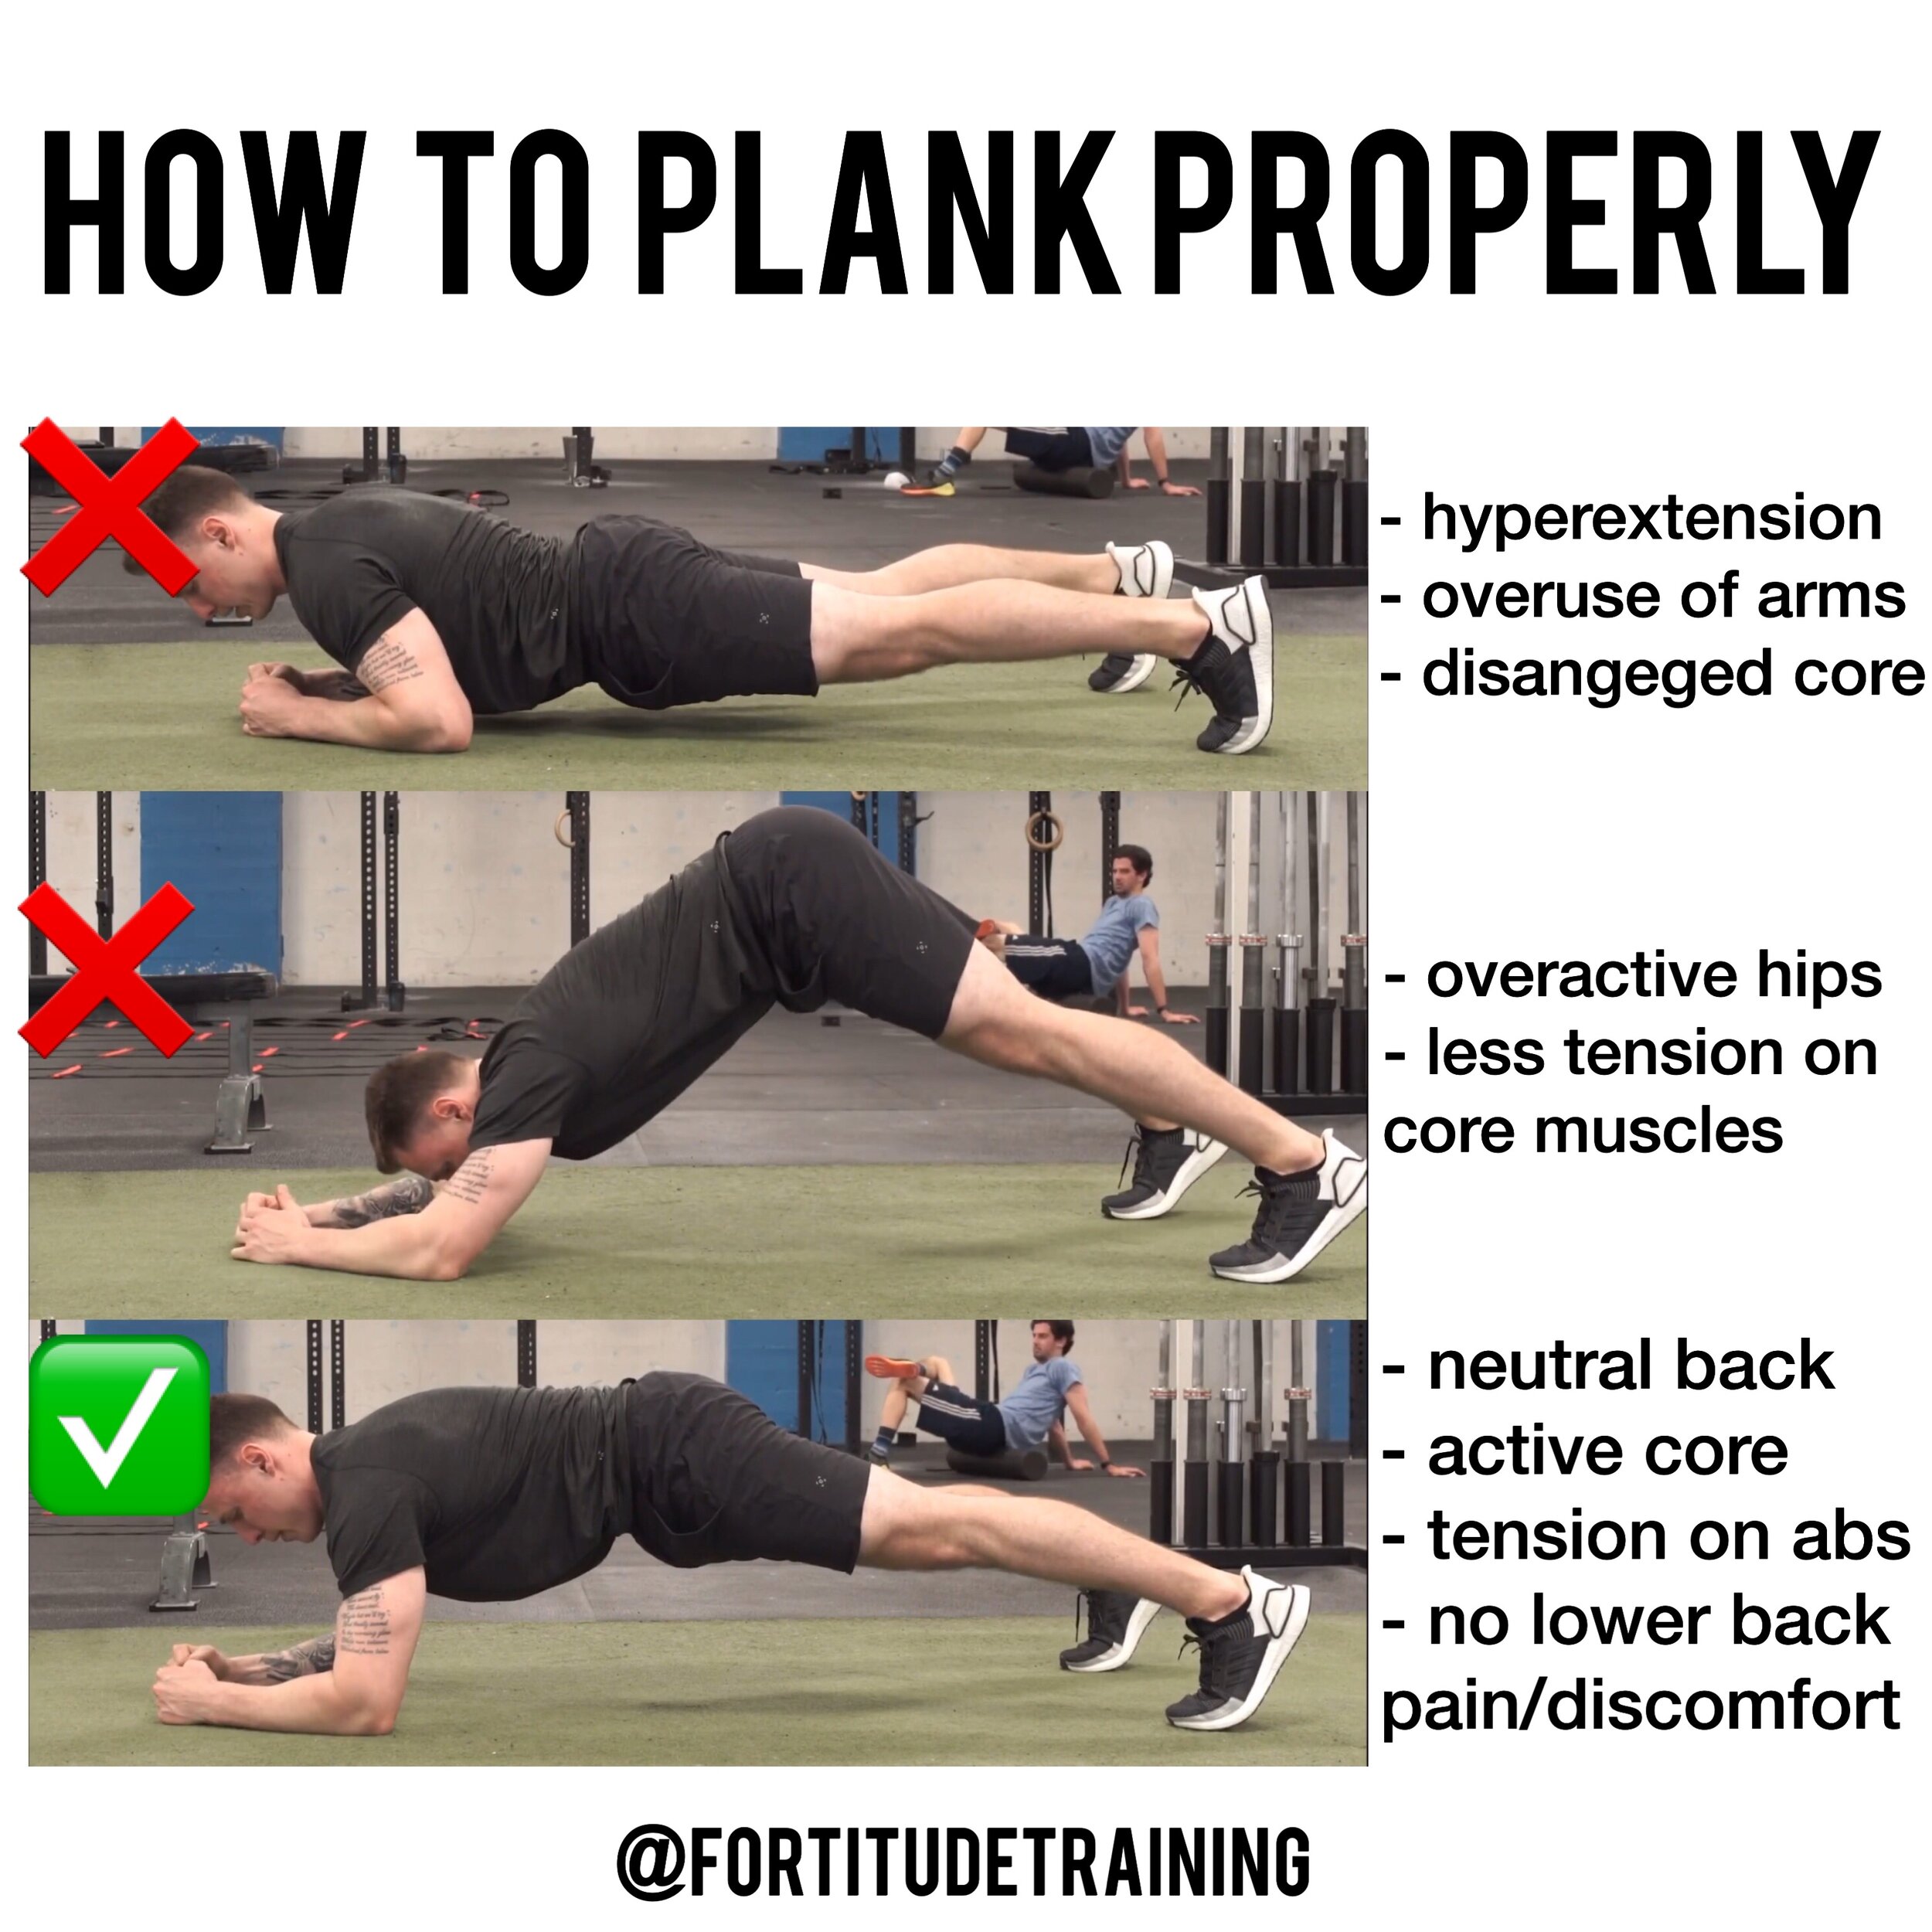
I know what you’re thinking, “Planks…how hard can those be?”. Well, they can be very hard, if done correctly. The problem is not a lot of people actually know how to do them well. You’ll usually see people sticking their butts up in the air, or sloping their lower backs to the floor. All the while their core is completely ignored and the whole purpose of the plank is negated.

Planks are one of, if not the most, under-utilized exercises in the gym. And, to be honest, I’m not exactly sure why? There’s so many reasons to do them:
- You don’t need any equipment.
- They’re scalable.
- Reduces lower back pain.
- Improves posture.
- Improves overall strength.
- Tons of variety.
One reason that might draw some people back from doing planks is the simple fact that they’re challenging. They don’t look like much, but when performed correctly, they are one of the best exercises you can do for your core.
“Why are planks one of the best exercises for your core?”
When you go to the gym and do an exercise, try to think of how that exercise is going to benefit you on a day-day-basis. Think of what muscle groups you’re using and how that’s going to impact your daily activities.
The main function of the core is to stabilize the spine. That means our core is working hard to provide a support system for the spine throughout the day. So what better exercise to use for the core than one that directly mimics it’s main function (to stabilize the spine and maintain an optimal position).
The Proper Plank Set-Up
- Elbows directly below shoulders. Stack your elbows directly below your shoulders so your upper arm is completely perpendicular to the floor (pointed up straight to the ceiling). Don’t make the mistake of shifting your weight forward excessively so your shoulders drift past your elbows.
- Scapula set. Set your shoulders back and down for a strong scapular position and “tall shoulders”. You want to push through the floor with your forearms and keep your scapula set for a stronger plank.
- Tall head. Your head should be in alignment with your upper back, not looking down at your feet or up in the air. Keep your chin slightly tucked and imagine a string attached to the back of your head pulling it up to the ceiling. This is a better position for the neck during planks.
- Lower back flat. You want a neutral lower back position during planks to keep the core engaged. A common mistake and/or cause of fatigue is hyperextension (curving) in the lower back. This means the core is disengaged and is no longer supporting the spine, therefore turning the plank from a core-strengthening exercise to a harmful position for the back.
- Core engaged. You hear coaches yell, “Tight core! Keep your core engaged!”, but wtf does that even mean? How do you actually engage your core? Keep reading and you will learn exactly how.
- Legs locked. Keep your legs straight the entire fucking time.
- Glutes engaged. Your glutes are actually one of the other “helpers” when it comes to the team of muscles that work together to support the spine. Squeeze your glutes like you do at the finish of a squat and keep them engaged throughout the entire plank.
“How do you engage your core?”
There’s a very simple, straight forward way to engage your core. Here’s how:
- Neutral. Get your lower back to a flat, neutral position by tucking your pelvis in slightly. Wtf does that mean you ask? Your pelvis is like the steering wheel for the lower back. You can tilt it anteriorly (think J-Lo butt) and posteriorly (think sad dog tucking its tail in between its legs). You want something kinda in between a J-Lo and a sad dog. Think sad J-Lo.
- Breathe. Take a big air in through the stomach. By doing so, your stomach should expand slightly without your ribs flaring out. This is called diaphragmatic breathing.
- Brace. After you take a big air in, you want to hold your breath and tuck your belly button back towards your spine. With your ribs drawn down (not flaring out) and your lower back in a neutral position, you have an engaged core. Breathe throughout your plank while maintaining this position. Once you lose core engagement, the set is over. Stop, rest, and recover for your next set.
Plank Progressions
Ok, you’ve mastered the standard plank. Now it’s time to spice things up a bit and take the intensity up a notch. Here are some more advanced progressions of the plank, each holding their own unique benefits.
RKC or Hard-Style Plank
I love this one because it’s easy to understand and packs a ton of work in a short amount of time. Our muscles respond to force, and they contract three ways (concentrically, eccentrically, and isometrically).
During this plank variation, you want to create as much tension as possible in your entire body and squeeze every single muscle you have. This creates an isometric contraction and forces your muscles to work harder during the plank position.
Start by tensing your muscles as hard as you can and squeezing for 5 sec then “relaxing” your muscles while still in the plank position for 10 sec. Repeat that three times no rest for a total of 45 sec. Rest 15 sec completely then repeat for a total of 3 rounds.
Weighted Hallow Plank
The hallow plank is a great exercise even without a medicine ball. Set your body up like a banana. Lower back flat on the ground, core engaged (ribs drawn down), and hold for 20-30 sec intervals.
Bench Plank with Chains
Other than just looking cool, there’s actually a reason to be elevated on benches and using chains. You might be asking “why not just put a plate on your back?” and the answer is you can, it’s just a different challenge for the core. A plate is fairly stable, chains are not. They’re hanging and swinging, making the load much less consistent a plate. This challenges your core stabilizers differently than a plate. Both are great. Neither are better than the other.
Weighted Plank
The weighted plank is awesome because it creates more tension in the core immediately and is scalable. Pro tip: place the plate on your mid-back directly for more core engagement. Placing the plate too high on the back towards the shoulders puts the emphasis on the arms.
Extended Standard Plank
This variation goes against most of what we’ve gone over so far in terms of proper positioning during planks, but there’s reasoning behind it. Have your feet on sliders or a couple of small towels (something that can slide) and set yourself up in a standard plank position. From there, slide your feet back so your bodyweight shifts back and your arms are extended out in front of you (your elbows should be in front of your shoulders).
This puts added tension in the core because now you’re really cranking up it’s responsibility to stabilize the spine. The plank is naturally a stabilization and anti-extension exercise (your body is resisting the urge to hyperextend the back). Only do this variation once you’re comfortable with the standard plank to avoid learning improper plank technique if just getting started.
Unlateral Standard Plank
This is basically holding a standard plank position, but on one arm. No, it’s not a side plank, it’s much more challenging. The idea is to keep your body the exact same position as it would be in a regular plank, but only balance on one arm. Pretend you have something balancing on your lower back and you don’t want it to fall off in order to keep your hips flat and your back parallel with the floor. Have your free arm extended out straight to the side and really push your stabilizing arm through the floor. Keep full body tension and hold for about 20 sec per side.
Thanks for reading! Any questions or comments about today’s article? Shoot me a message down below!